
Quick Summary Proper installation determines stability & interactive performance of radar interactive LED floor tile screen. YUSUN SMART supports three mainstream installation solutions for different site conditions.
Overview of 3 Installation Options
Our radar‑driven interactive LED floor tile screen offers three practical installation solutions: direct ground mounting, track mounting, and welded steel‑structure mounting. Project engineers can select the solution according to ground condition, load‑bearing capacity and construction budget. Adjustable support feet are pre‑installed on cabinet bottom for leveling adjustment in most scenarios.
Option 1 — Direct Ground Mounting
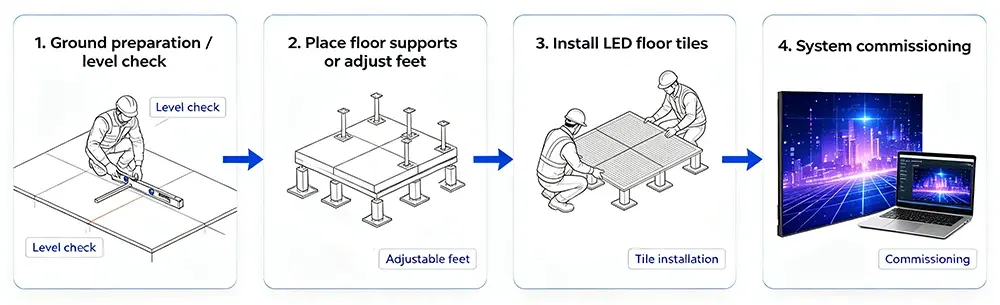
Direct ground mounting is the most‑used solution for finished hardened ground.
- Site prerequisite: The ground surface must be fully hardened. Soft soil, loose floor or uneven ground is not allowed. Ground hardening, leveling base plate and civil‑work modification are completed by customer‑side on‑site.
- Operation: Place LED floor tile cabinets directly on hardened ground. Use built‑in adjustable support feet to calibrate flatness. No extra steel frame required.
- Best‑fit scenario: Shopping mall exhibition hall, indoor event space with existing solid concrete ground.
Note: Do not lay screens directly on carpet, asphalt or deformable ground substrate.
Option 2 — Track Mounting
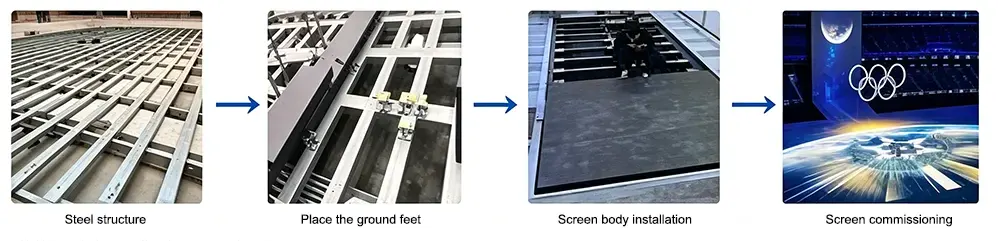
Track mounting uses pre‑laid metal track as positioning base.
- Site prerequisite: Flat and solid base ground. Lay metal tracks in advance to fix cabinets.
- Operation: Fasten cabinets onto installed metal tracks. Tracks help align cabinets neatly and simplify later disassembly & re‑layout.
- Best‑fit scenario: Temporary exhibition, roadshow, frequently‑changed event projects, convenient for repeated dismantling and reuse.
Option 3 — Welded Steel‑Structure Mounting
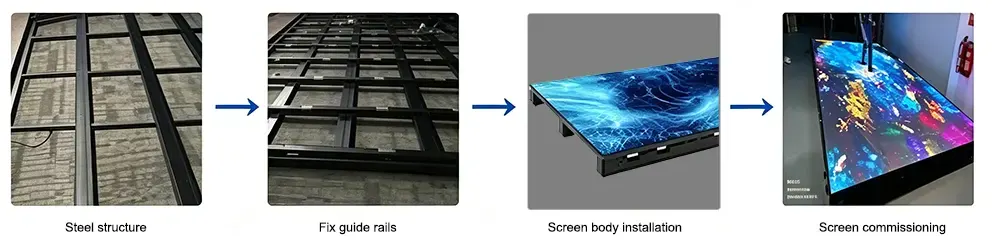
Welded steel‑structure mounting applies for sites where ground bearing is insufficient or raised height is required. ‑ Site prerequisite: Custom‑made welded steel‑structure frame according to site load‑bearing demand. YUSUN SMART can provide steel‑structure design drawings for customer reference. ‑ Operation: Finish steel‑structure welding & anti‑rust treatment first. Mount LED floor tile cabinets on top of steel frame, adjust level by cabinet support feet. ‑ Best‑fit scenario: Plaza outdoor projects, raised stage, places need extra ground load‑bearing reinforcement.
Important Pre‑installation Reminders
- For TOF ceiling‑mount radar: Reserve proper overhead installation space, keep maximum 10‑meter radar scanning radius without shelter.
- Power supply & signal wiring shall follow our official wiring schematic diagram.
- All three installation methods require flatness inspection after cabinet laying to avoid screen module stress damage.
- Civil‑work, ground hardening, steel‑structure fabrication belong to on‑site customer work scope, not included in screen product scope.
Post‑installation Debugging
After mechanical installation finished, connect control system, launch supporting interactive software, calibrate TOF radar induction range. Test walking interactive feedback to ensure low‑latency trigger effect before project hand‑over.
YUSUN SMART On‑site Support
YUSUN SMART provides wholesale OEM & ODM radar interactive LED floor tile screen. We supply technical drawings and remote debugging guidance for global commercial projects.